Showing posts with label recipe. Show all posts

Wednesday, July 8, 2015

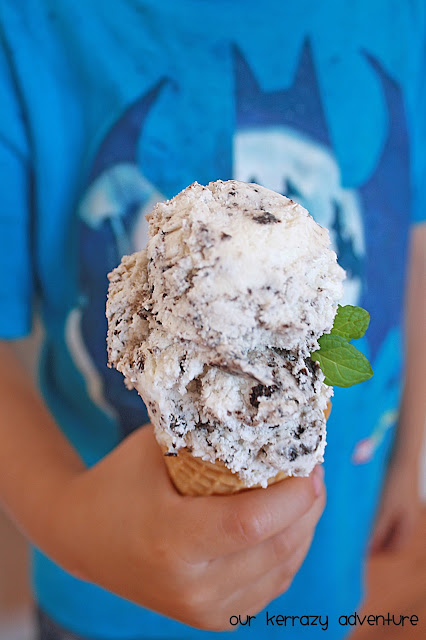
Mint Oreo Ice Cream Recipe


Our family bought an ice cream maker at this awesome Thrift Store in Mesa, Az. It was only $7! I LOVE ice cream. And homemade ice cream is perfect for our Summer Fun List. We decided to make Oreo Mint first. I love Oreo's! You could go really crazy and use Mint Oreo's as well! Our family loves buying Oreo's in bulk at Sam's Club. It's also where I buy our whipping cream. So much cheaper! 

Oreo Mint Ice Cream

1 1/4 c milk
1 1/2 c sugar
1 T vanilla extract
4 c heavy whipping cream
1 tsp peppermint extract
2 rows of Oreo's

Scald milk until it bubbles from around the edge of the pan. Remove from heat and add sugar and salt. Stir until dissolved. Stir in whipping cream and vanilla. Cover and refrigerate for 30 minutes. Remove and add peppermint extract. You could also add green food coloring, but I prefer to not have extra dyes in my food. (Unless it's Read Across America Day or St. Patrick's) Pour in ice cream maker and follow manufacturers directions. I like to layer my ice and ice cream salt. After about 30 minutes add crushed Oreo's. Return your ice cream to the freezer. I like it to be in there for a couple of hours, but my hubby prefers it softer. Enjoy!

recipe adapted from Rival 


In case you need a good ice cream maker, seeing I bought the last one from 360 Thrift, you can check out the link above. 


Some of these items are affiliated links. You are welcomed to buy from anywhere. But I don't mind if you buy them from here. I only share items I really like or use. Thanks for your support!


Thursday, July 2, 2015

Mom’s Sweet & Sour Chicken


IMG_9307
This is probably one of my favorite recipes from my mom. It’s defiantly the hubby’s favorite! I love to take this to new moms right after they have their babies. The sauce isn’t too sweet or too spicy. I keep everything separate in case she doesn’t want sauce all over her rice. And I also bring a vegetable. Usually not Brussels sprouts, though I love them. I am the only one in my family. I made Yoda try them this week and he gave them two thumbs down.

The secret ingredient for this super easy dinner…
IMG_4830
I haven’t been able to find it in Arizona so far. So when I travel to California I pick up a bunch of cans.
Mom’s Sweet & Sour Chicken
Heat Oven to 350*. Place a couple tablespoons of butter in a glass baking pan and place in your preheated oven. After a couple of minutes add a couple of chicken breasts. Bake for 30 minutes. Pull out and pour two cans of Contadina Sweet and Sour sauce over the chicken. Put it back in the oven for another 30 minutes and you are done.
Serve over rice and add some vegetables.
Easy. Quick. And yummy.

Wednesday, July 1, 2015

Tips for Making Star Wars Pancakes using Pancake Molds


IMG_8199
As a Star Wars family these pancake molds were the perfect thing! They are perfect for Father’s Day, birthdays, May the 4th be with you… days, or anytime you want to add some fun to your day. Making them is pretty straight forward but I have found some tips when using pancakes mold that I wanted to share with you.
The Recipe.
It really helps to have a very liquidy recipe when using pancake molds. I have played around prefer the one listed below.
IMG_7998

Padme’s Pancakes
(Isn’t it that a fun name for a recipe. I’m sure that if she didn’t {SPOILER} die of a broken heart she would have used this recipe of mine to make these for little Luke and Leia)
2 cups of sifted flour
1 tsp salt
2 Tblsp sugar
4 tsp baking powder
2 eggs, mixed well
3 cups milk
6 Tbsp butter, melted
Preheat griddle. Sift dry ingredients together. Combined all other ingredients in a large mixing bowl. Slowly add your sifted ingredients.

IMG_8175
Tools Needed

I love using the griddle my mom got for me. Sometimes I will use a regular frying pan, but the griddle is so flat and distributes the heat so nicely. I know, clearly I need better cook ware. I put my griddle on medium heat before I start collecting my tools. Make sure to spray your molds pretty well. Your pancake batter should be easy to pour into your squirt bottle because we are using a very liquefied recipe.
IMG_8178

Once your mold is on your preheated griddle go ahead and squirt that batter in. I try and do the face first. It’s best to work quickly for an even looking face. And some molds are easier than others. Once it starts to look a little set I use my spatula to outline the mold. I will lift (carefully because it is hot) the mold a little as I do this so it will fall out nicely. Go ahead and flip your pancake over.
IMG_8185
Continue re-spraying your molds as needed. And use your awesome spatula to remove any pancake fluff that can get stuck to your molds. It takes a little time, but when you see your little Jedi’s face light up with happiness it is all worth it. If you are running really late you can just make a regular pancake and punch out a face. Desperate times call for desperate measures.
IMG_7999
May the Force we with you!

Feel free to check out our other Star Wars Posts (and here)

Some of these items are affiliated links. You are welcomed to buy from anywhere. But I don't mind if you buy them from here. I only share items I really like or use. Thanks for your support!

Thursday, June 18, 2015

General Conference Rolls


General Confernce
Ever since Draco was a baby we have been making these General Conference Rolls. I love traditions. And watch General Conference every April and October is a tradition that is very important to our family. General Conference is a time for us to gather as a church and listen to prophets and apostle of the Lord Jesus Christ. Or in other words, we gather to hear the word of The Lord. Special foods and traditions can remind us of wonderful memories.
My husband grew up with the tradition of having banana pancakes every Sunday of Conference. We would usually head over there and watch it together. Then one weekend they were going away to their cabin. My husband wanted me to make the banana pancakes for our family. But honestly, I’m not really a banana girl.
This was the perfect time to start our own family tradition. I decided to try making homemade cinnamon rolls. Our family loved them and we have been making them ever since. My kids get so excited for conference. Gandalf told me I could be on TV and make these they are that good. We also started making them Christmas morning and I usually take some to our teachers for Teacher Appreciation Week. And they are also perfect for Father’s Day. I love family recipes and I love hearing my boys say they want to make these for their children.

General Confernce rolls
General Conference Cinnamon Rolls
Nutritional Information
Servings Per Recipe: 12
Amount Per Serving
Calories: 525
Carbs:82
{Source: Allrecipes}
Ingredients:
1 cup warm milk
2 eggs, room temperature
½ c margarine, melted
4 ½ c bread flour
1 t salt
½ c white sugar
2 ½ t bread machine yeast.
1 c brown sugar
1 ½ T ground cinnamon
1/3 c butter, softened
1-5oz package of cream cheese
1/2  c butter
2 c confectioners’ sugar
½ t vanilla
1/8 t salt
Place ingredients in the pan of the bread machine in the order recommended by the manufacturer. Select dough cycle; press start.
IMG_7114
After the dough has doubled in size turn it out on a lightly floured surface. Cover and let rest for 10 minutes. In a small bowl, combine cinnamon and brown sugar. Roll dough into a 16x21 inch rectangle. Spread dough with 1/3 c butter and sprinkle with sugar mixture. Roll up dough and cut into 12 rolls. Place rolls in a greased 9x13 pan. I leave my out overnight. Bake rolls at 400* for 10-15 minutes. Beat cream cheese, sugar, salt, vanilla, and spread on rolls. Serve warm.
 
I started making 24 rolls instead of 12 to cut down the carb amount after Draco was diagnosed with type 1 diabetes. My friend Alex gave me the tip to leave them out overnight. They taste so much better and I get so much more sleep. I also frost them as we eat them. They usually last a couple days unless we are having conference with extended family. It is easier to re-heat them that way. Re-heated frosting isn’t nearly as tasty.
I hope you enjoy this recipe and it becomes a family favorite in your family too!


Tuesday, May 12, 2015

Lion House Rolls Recipe


Sometimes I feel bad that I can't give my children everything my heart desires. One thing that I can and do give them is homemade bread. One of my favorite friends taught me how to make bread and it has blessed my life so much. With very cheap ingredients I can make my family some thing simply amazing.

In Salt Lake City at Temple Square there is a Lion House Restaurant. Being a native Californian I have learned it is a pretty awesome thing to have your wedding lunch at this historic place. Their Lion House Rolls are their most famous item. They are truly amazing. I love making them for Thanksgiving or any other special family gathering. My kids absolutely love them. They know Lion House Rolls are tastier than any other roll.

I encourage you to try them yourself just to see what all the hype is about. You may find yourself wondering, "What else do the Mormon's know?" (Because they are that good.) You then are welcomed to contact Mormon missionaries or request a free Book of Mormon. Learning from missionaries had blessed me even more than these yummy rolls. 

Lion House Rolls

2 T yeast

2 C. warm water

1/3 C butter or shortening

1/3 C. Sugar

2 ½ tsp salt

2/3 C nonfat dry milk

1 egg

5 to 5 1/2 Cups bread flour

Mix your water, milk, and yeast. Let stand about 10 minutes till foamy. Add sugar, salt, butter, egg, and 2 cups of flour. Using your dough attachment (or by hand if you are still saving up for a mixer) Mix on low till wet and then increase speed. Stop and add flour until your dough is soft and not super sticky.

Place dough in a greased bowl and cover with a damp towel or plastic. Allow it to rise until doubled. Scrape onto a silicone mate and roll it out to a large rectangle. Then using a butter knife cut the rolls into long  2 inch strips. Roll your strip on to itself two times. Usually I make about 18 rolls.

Place them on your stone ware or silicone baking mats. Cover them with plastic wrap and let them rise again for another hour or so. Bake at 375 degrees anywhere from 15-20 minutes.


Tuesday, May 5, 2015

Grandma Happy Cake


Tonight we celebrated my Grandma "Happy's" birthday. It all started when my mom threw a bridal shower from me. Everyone invited brought a recipe to give me. My Grandma gave me a recipe called "Better than SEX cake". I guess that is a thing. Or a typical dessert name which I didn't know being a 19 year old bride. It was just awkward. I was like, "Um... thanks Grandma." And she was like, "And it really is." which didn't help the awkward factor.


I didn't really make it. But one year after driving back from visiting her I was thinking about it. And I thought it would be great to make it for her birthday. Clearly she really liked it. But as it turned out she died the next week. I felt bad I never made my Grandma her favorite dessert for her. I decided I would make it on her birthday to honor her. I invited my little sister over and we had it together. That was the beginning of our family tradition to make our Grandparent's favorite dessert on their birthdays. This tradition has helped us grow closer together and to them.


Years later my son Draco would talk about her and how he loved her, which surprised me. Because he wasn't crazy about her when she was around. We didn't see her often enough and he did not like strangers or the elderly. Then I realized he really loved her dessert. This tradition has helped him feel closer to her. Personally it's not my favorite, but I love chocolate. My friend Linda once asked, "How can it be a 'better than sex cake if there isn't chocolate?'

To keep us from wasting a whole cake I now make the cake into two loaf pans. It makes the cake look adorable for one. And we use the other one with fresh strawberries and whip cream.


Better than Sex Cake or

Grandma Happy Cake

1 pkg. Betty Crocker yellow cake mix
1 lb. can crushed pineapple
1 cup sugar
1 6 oz. instant puddling mix vanilla
1 9 oz. bowl cool whip
1 pkg. shredded coconut

Cake Pan 9x13
Prepare cake to directions on box. Heat pineapple and sugar until dissolved. While cake is still warm poke holes in it with a toothpick, then pour inside. Pudding is then spread over it. And then cool whip. Add coconut on top. Add nuts if desired. 


Draco had a great idea to use our snack pack pudding from the garage for this cake. One less thing for me to make. He gobbled it up. He loves this cake. Yoda (my chocolate boy) didn't like it. Baby girl was a fan. And even asked for "more cake". I went ahead and gave her some more. Because that is what my Grandma would have done. She never got to meet baby girl on the earth. But I think she would have ADORED her. My Grandma absolutely loves blonde hair. And she loved the color pink, dolls, and lots of other girly things. And baby girl is one girly girl.


I am so thankful for family recipes! I am thankful we can take time from our busy lives to stop, eat cake and remember those we love. I would encourage everyone to try and preserve and get copies of family recipes. They are such a blessing in our families. I wish I had more recipes.


I am so thankful for the knowledge that families are forever and that I can see my Grandmother someday!!!


Friday, April 17, 2015

Our Family’s Favorite Crepes


Crepes
Our family loves eating dessert crepes. Especially on Shrove Tuesday, Valentine’s Day, and some times random Sundays. Sometimes we even make savory crepes and have them for dinner. We each have our favorite kind. One of my favorite things about making crepes is that everyone can build their own. This dinner is also perfect for when you have leftover ingredients.
If you are in Orange County check out Rockin’ Crepes. They are fresh, really big, and packed with yummy ingredients. Our family loves to eat there. But now that we live in Arizona it’s nice to make them at home as well.
IMG_5628
Start with your basic crepe recipe here
Then you can add your favorite toppings. I like to make them and then put them in the oven after the toppings to get the cheese nice and melted. First I will share my favorite….
IMG_6506
Top with:
  • Chicken
  • Sliced tomato
  • Sliced onion
  • Provolone cheese
  • Pesto Sauce
IMG_6527
The Pizza Crepe is Yoda and Draco’s favorite.
Top with:
  • Pasta sauce
  • pepperoni
  • Mozzarella cheese
IMG_6537
Gandalf and Baby girl love this one.
Top with:
  • Scrambled eggs
  • Cheese
IMG_6543
And if we don’t have fresh strawberries we will add Nutella and crushed Oreo’s. Pretty much staples in our home.

Pretty simple, but makes for a yummy quick dinner.

Tuesday, April 7, 2015

Homemade Ice Cream Cookie Sandwiches

IMG_6871

This isn’t a revolutionary recipe. So why haven’t I made them sooner? Years ago I bought this tool to make ice cream sandwiches. It was in a fundraising catalog to help my niece’s school. And I just used it for the first time last month. Why did I wait to make these yummy treats? They were perfect for family night.

Homemade Ice Cream Cookie Sandwiches
even number of cookies
your favorite ice cream
plastic wrap
ice cream cookie tool

ice cream cookie collage
Just take your favorite homemade cookie (Store bought ones work great too!) and place it inside your sandwich maker. Scoop in some of your favorite softened ice cream and top with another cookie about the same size. Push the cookie together. I like putting it back in the freezer and pulling it out in 15 minutes or so. (Perfect in the morning as I had dishes to unload and plenty to do around the kitchen) Then drop it on some plastic wrap and wrap it up. Put it back in the freezer. And repeat. Pull them out a couple hours later and enjoy!

IMG_6859
Imagine the possibilities!
Chocolate Chip Cookie with Chocolate Ice Cream…
Mint ‘n Chip Ice Cream with Chocolate Cookies…
Snicker doodles with Vanilla….
Peanut Butter Cookies with Chocolate Ice Cream.
I even thought about rolling the ice cream in sprinkles, but I like to reduce unnecessary  sugar with my diabetic son. But they would look darling! Great for parties, holidays, or family nights. The first Sunday of the month is Cookie Night. A great idea we got from some of our favorite friends. We make cookies and invite others over. It’s a great way to fellowship and make friends. I love taking extra cookies from Sunday and making these bad boys for family night.  Hope you enjoy!!!
Some of these items are affiliated links. You are welcomed to buy from anywhere. But I don't mind if you buy them from here. I only share items I really like or use. Thanks for your support!

Monday, March 9, 2015

Home Made Crepes


Our family loves crepes. Or English pancakes. We make them every Shrove Tuesday, an English holiday where they clean out their cupboards before Lent. Traditionally English pancakes have lemon juice and sugar, but our family loves Nutella, strawberries, and whipped cream. 

We learned about this holiday from one of my dearest friends who is from England. (I think I may like this holiday even more than our other favorite English holiday.) And we miss her and her family dearly. We loved going over Shrove Tuesday morning. She always made the pancakes, and could flip them properly in the air. I'd bring and slice the strawberries. It was the least I can do.

But we love these so much we make them year round. I've made them when we had a girls trip away for breakfast. And they make a yummy night time snack. And I can make one with only 15 carbs, Perfect for my type 1 diabetic son's snack. I simply add 1 oz. strawberries and spread a small amount of Nutella. Then top with a bit of whip cream, (not like pictured above)

Crepes
{recipe from All recipes}
4 eggs, beaten
1 1/3 c milk
2 T Butter, melted
1 C flour
2 T sugar
½ salt

Whisk till smooth. Heat med pan over med heat, grease with small amount. Using a small ladle, cook on skillet. Pick up pan and twirl around so the batter covers the pan. Flip when it starts to look set. Serve immediately. Makes 11 crepes.

Top with Nutella, Oreo's, strawberries, bananas, or whipped cream. Really anything.

If you are in Orange County and don't want to make them yourselves, check out Rockin' Crepes. Their crepes are big and amazing! And they have so many to choose from. It is a bar, but they have fun board games there as well. We love taking our kids, we just don't take them on a Friday or Saturday night. 


Friday, February 27, 2015

Kristin's Enchiladas


Years ago my dear friend and co-worker from the salon I use to work atKristin  shared her yummy enchilada recipe with me. It's a family favorite. Truthfully my hubby would rather our enchiladas were made with red sauce, ground beef, and flour tortillas. But I love green sauce and chicken. And I am making them. So our children are brought up on green sauce enchiladas.

When I first made these my hubby asked what all the green stuff was. I told him cilantro, which is true. But there is also spinach. I love that this recipe has extra greens in it. And is still super tasty. Eventually my hubby found out about the spinach. But there is cilantro in it as well (Yum!) So what I told him was true. From a certain point of view.

Gandalf loves this. Probably his 2nd favorite meal, after pizza of course. And Draco loves this too. And he even eats the spinach now, instead of picking it out. He has come so far. I'm sure your family will love this meal as well.


Kristin’s Chicken Enchilada’s

Ingredients:
5 chicken breasts, boiled and shredded. (Use the paddle attachment on your Kitchen Aid. It works great!)
1 block cheddar cheese, grated (Sometimes I cheat and use the pre shredded cheese)
1 block Monterrey Jack Cheese, grated
1 bag of spinach
Las Palmas medium green sauce (The best!)
18 corn tortillas, fried
½ white onion chopped
½ bunch of cilantro


Layers in a 9x13 pan
1.      Sauce
2.    6 tortillas
3.   Chicken (1/2 of it)
4.   Spinach (1/2 of it)
5.   Cheeses (about 1/3)
6.   Onions (1/3)
7.  Cilantro (1/3)

Repeat 1-7 starting with the sauce, and top with cheese.

Cook at 350* for 30 minutes. Allow at least 10 minutes to cool. Add avocado or sour cream if needed…


The fried tortillas make this dish extra amazing. And I love how you layer the ingredients. It saves so much time. Sometimes I'll make an extra one and freeze it as well. If you need a guacamole recipe to top it off check out my favorite one here.


Enjoy!

Friday, February 6, 2015

My Favorite Guacamole


Last month when I went home to California I was blessed to get some avocados from my in laws. They have the BEST avocados!!! We have avocados from California shipped here, but they don't taste as great. My in laws taste like butter! Amazing flavored butter! They ripened quickly here like most things do and so I had a large amount that were ripe at the same time. We made guacamole after church one day and ate the whole batch right then.


Aren't these beautiful? 
My Favorite Guacamole

4 or 5 avocados
tomato, chopped
Cilantro, at least half the batch
limes juice from 2 or 3 limes
Red onion, chopped
Garlic Salt

Scoop out the avocado goodness into a bowl. Mash it with a fork or potato masher. I don't like my avocados all the way mashed. It's good to have some lumps. Add chopped onion, tomato, and cilantro and stir that in. Now I always eye how much to add. You want it to be colorful, like your eating a rainbow. Then using my juicing tool from Pampered Chef I add quite a bit of lime (we don't want to waste any juice.) . Now add quite a bit of seasoning. Then grab a spoon and sample. If you can't taste the lime or garlic add more as needed. Stir well and throw some pits back in there to keep it from going brown. Although you might just eat it all in one sitting like we did as we played Book of Mormon Who that Sunday afternoon.

We ended up using a white onion because it is what we had and it was the Sabbath. And since we forgot to buy chips the day before we cut up corn tortillas with a pizza cutter and fried and salted them. They were awesome. 

I also wanted to share this fun new addition to our family room. 


I love it our new space!

Before we moved my hubby got a new to us TV off a friend. We were super thankful it fit in the space we have available in our family room. I was bummed our Entertainment center didn't work in this house but we found a way to make the best of it. But our TV left this giant hole that I really didn't like. I tried to find a piece to buy to put it in there but wasn't happy with anything.


Then I thought I could make something but as I was figuring out the wood costs it didn't seem worth it as we are hoping to buy a new place in year or so. I didn't want to make something that might not work in our next place. Then I got an idea. I was about to post a picture of an old desk hutch from my hubby's old desk on a garage sale page. It was sturdy and a great piece of wood. Then I realized it was perfect for this spot.

I painted it white and we were all set to only to realize it was about two inches too tall. My hubby said our little cutting tool wouldn't be able to cut it. So we used it as a shelf next to our couch. It has been serving as a perfect storage for baby girls toys. And for therapy we have been using it to help her bend and reach objects. It was the perfect height for her to be on her knees and play and then to help her stand and put toys on the top. My intent was to find someone with a better saw to help us cut a little shorter, but I am thankful it worked as a good resource for physical therapy.

Now that she has moved on to trying to stand on her own and I feel more comfortable cutting wood with our tool thanks to my wood map sign, I tried last week to cut shorter. It ended up working out great, I just had to go really slow. I love that we were able to reuse something we already had to fix a problem. I love saving money and making my home more beautiful. 

Sunday, November 23, 2014

Our Family History Traditions: Remembering Jack


Years ago I came across a recipe from my Grandmother that I never made. I decided to make it on her birthday to remember her. And thus one of my favorite traditions was born.

On each of mine and my husbands Grandparents birthdays we celebrate and remember them by making their favorite dessert. It is a great way for our children to feel connected to their Great Grandparents, some of them they have never met. My second son Draco kept talking about my Grandma Happy and how much he loved her. I was kinda surprised because he didn't know her that well and wouldn't kiss her goodbye. (He is my grumpiest child) Then I figured it out!

He loved the dessert we made for her birthday!

Yesterday we talked about my husbands Grandma Jack. We have his picture up in our house. My second son and husband carry his middle name. My kids know him even though only my eldest son has met him when he was a baby. But as we share stories about him over Cherry Cobbler, and I quiz my sons about his life, we feel a connection. And they can develop a love for him and look forward to when they can see him again.

Isn't he handsome?
I love my hubby's grandpa! He was a kind gentle man. He adored his wife and daughters. He was active in his church and loved to play baseball. He loved The Lord and his family. I cherish the time I was able to spend with him. One of my favorite memories was when we were sitting in his living room and I was asking him all kinds of questions he stopped me and said, "You really care, don't you." I assured him that of course I cared, he was family. I knew it touched his heart that I saw value in his life and wanted to know about him. Grandparents are important and aren't here on earth long enough. 


Pictured above is that special day when we were able to go to the temple as a family and seal Grandpa and Grandma to each other forever. I believe that marriage can be eternal. That is why temples are so important. Because they enable family relationships perpetuate beyond the grave. I love Jack dearly and look forward to seeing him again someday. I know that if I invest time and teach my sons and daughter about him they will will know him and will gain strength from his good life. I am sure he is looking out for them. And his heart of full as he sees his posterity remember him.

Cherry Cobbler
From "Grandma Suzie"

Made to celebrate Grandpa Jack 


2 Cans of Cherry Pie Filling (I usually put an extra can or two because my family really likes the thicker filling)
2/3 Cup of Water
1 Yellow Cake Mix (any kind, or even white)
1/2 lb. of Melted Butter (not margarine)
(I added a little brown sugar and oats too)
1 Small package of Chopped Pecans (optional; we use more...like 1 1/2 cups.....or even walnuts)
I add 1/4 c of brown sugar and oats

            Pour Cherry Pie Filling into a buttered or "Pammed" pan (9 x 13).   Pour the water over the pie filling.  Sift the cake mix over the top of filling and water.  Pour the melted butter over all.  Cover with the chopped nuts.  Bake for approx. 45 minutes at 350 degrees.  Serve warm with vanilla ice cream or whipped cream. 


We love using this special recipe from my dear friend Suzie! She is a great example and lovely in all things. She is so great at gathering with her family and is always cooking for them. I knew I would love her recipe.

 I leave out the nuts. If you half this recipe and add a 1/4 cup of brown sugar and 1/4 cup oats and serve 8 slices you would have about 45 carbs per serving.

Baby girl loves her great grandpa and his favorite dessert 

Tuesday, November 18, 2014

My Hubby's Mashed Potatoes

My favorite food at Thanksgiving is Mashed Potatoes. And my Hubby makes my favorite kind. Not only are they creamy and buttery, but when he makes them himself it's one less thing for me to make. They are pretty rich, but hey, it's Thanksgiving. I did make them more often when I was trying to get baby girl to gain some weight. Surprisingly, she doesn't like them. It must be a texture thing. All my boys love them. They are the only mashed potatoes Draco will eat. And I love that you don't peel them. Yay for less work!

Read ahead to get our family recipe that we have been making for years.


Hubby’s Mashed Potatoes
10 lbs of Yukon Gold potatoes (I will sometimes use red potatoes if they are on sale)
½ cup Heavy Cream (Buy it at Sam’s or Costco, so much cheaper)
1 ¼  Tbsp Kosher Salt
¾ Black Pepper
1 ¾ lb European Butter (richer and creamier)

Wash Potatoes. In a large pot boil unpeeled potatoes after cutting them into big chunks to speed up the cooking time. When fork tender, drain thoroughly. Add potatoes to a large bowl along with the rest of the ingredients. Cube up your butter first to help distribute the butter. Using a hand masher combine everything. Your potatoes should be creamy but still have some lumps. Grab a new spoon and taste. Feel free to add more salt or cream.


Feel free to check out his blog and see movie reviews and podcast on the 3rd hour block lessons.